Springboot中整合knife4j
主要是前后端分离的外网接口. 主要采用Security的时候增加短信验证; 这些主要是废话,用来占空间的。 作者:liuren
链接:https://www.codepeople.cn/2020/03/20/SpringBoot2.x-knife4j/
来源:https://www.codepeople.cn/2020/03/20/SpringBoot2.x-knife4j/
版权声明:本文为原创文章,遵循 CC 4.0 BY-SA 版权协议,转载请附上原文出处链接及本声明。
knife4j的官网地址
https://doc.xiaominfo.com/knife4j/springboot.html
一、首先引入的pom.xml文件包
<?xml version="1.0" encoding="UTF-8"?>
<project xmlns="http://maven.apache.org/POM/4.0.0" xmlns:xsi="http://www.w3.org/2001/XMLSchema-instance"
	xsi:schemaLocation="http://maven.apache.org/POM/4.0.0 https://maven.apache.org/xsd/maven-4.0.0.xsd">
	<modelVersion>4.0.0</modelVersion>
	<parent>
		<groupId>org.springframework.boot</groupId>
		<artifactId>spring-boot-starter-parent</artifactId>
		<version>2.2.5.RELEASE</version>
		<relativePath/> <!-- lookup parent from repository -->
	</parent>
	<groupId>cn.codepeople</groupId>
	<artifactId>springboot-knife4j</artifactId>
	<version>0.0.1-SNAPSHOT</version>
	<name>springboot-knife4j</name>
	<description>springboot整合knife4j的接口框架</description>

	<properties>
		<java.version>1.8</java.version>
	</properties>

	<dependencies>
		<dependency>
			<groupId>org.springframework.boot</groupId>
			<artifactId>spring-boot-starter-web</artifactId>
		</dependency>

		<dependency>
			<groupId>org.springframework.boot</groupId>
			<artifactId>spring-boot-devtools</artifactId>
			<scope>runtime</scope>
			<optional>true</optional>
		</dependency>
		<dependency>
			<groupId>org.projectlombok</groupId>
			<artifactId>lombok</artifactId>
			<optional>true</optional>
		</dependency>
		<dependency>
		    <groupId>com.github.xiaoymin</groupId>
		    <artifactId>knife4j-spring-boot-starter</artifactId>
		    <!--在引用时请在maven中央仓库搜索最新版本号-->
		    <version>2.0.2</version>
		</dependency>
		<dependency>
			<groupId>org.springframework.boot</groupId>
			<artifactId>spring-boot-starter-test</artifactId>
			<scope>test</scope>
			<exclusions>
				<exclusion>
					<groupId>org.junit.vintage</groupId>
					<artifactId>junit-vintage-engine</artifactId>
				</exclusion>
			</exclusions>
		</dependency>
	</dependencies>

	<build>
		<plugins>
			<plugin>
				<groupId>org.springframework.boot</groupId>
				<artifactId>spring-boot-maven-plugin</artifactId>
			</plugin>
		</plugins>
	</build>

</project>
项目结构图
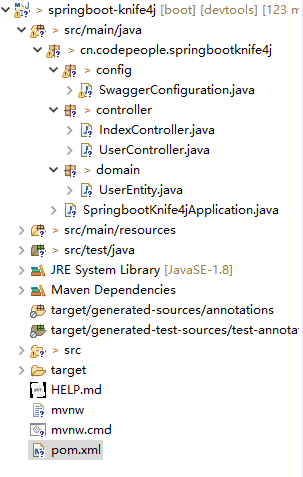
开始整合knife4j
SwaggerConfiguration.java
package cn.codepeople.springbootknife4j.config;

import org.springframework.context.annotation.Bean;
import org.springframework.context.annotation.Configuration;
import org.springframework.context.annotation.Import;

import com.github.xiaoymin.knife4j.spring.annotations.EnableKnife4j;

import springfox.bean.validators.configuration.BeanValidatorPluginsConfiguration;
import springfox.documentation.builders.ApiInfoBuilder;
import springfox.documentation.builders.PathSelectors;
import springfox.documentation.builders.RequestHandlerSelectors;
import springfox.documentation.service.ApiInfo;
import springfox.documentation.spi.DocumentationType;
import springfox.documentation.spring.web.plugins.Docket;
import springfox.documentation.swagger2.annotations.EnableSwagger2;

@Configuration
@EnableSwagger2
@EnableKnife4j
@Import(BeanValidatorPluginsConfiguration.class)
public class SwaggerConfiguration {

	 @Bean(value = "defaultApi2")
	    public Docket defaultApi2() {
	        Docket docket=new Docket(DocumentationType.SWAGGER_2)
	                .apiInfo(apiInfo())
	                //分组名称
	                .groupName("2.X版本")
	                .select()
	                //这里指定Controller扫描包路径(项目路径也行)
	                .apis(RequestHandlerSelectors.basePackage("cn.codepeople.springbootknife4j"))
	                .paths(PathSelectors.any())
	                .build();
	        return docket;
	    }

	    private ApiInfo apiInfo() {
	        return new ApiInfoBuilder()
	                .title("knife4j测试")
	                .description("knife4j测试接口")
	                .termsOfServiceUrl("http://localhost:88888/")
	                .contact("10086@mail.com")
	                .version("1.0")
	                .build();
	    }
}
新建实体类
UserEntity.java
package cn.codepeople.springbootknife4j.domain;

import io.swagger.annotations.ApiModel;
import io.swagger.annotations.ApiModelProperty;
import lombok.Data;

@ApiModel(value = "用户模型")
@Data
public class UserEntity {

	@ApiModelProperty(value = "id", required = true, example = "1")
	private Integer id;

	@ApiModelProperty(value = "用户名", required = true, example = "张歆艺")
	private String name;
}
新建controller类
IndexController.java
package cn.codepeople.springbootknife4j.controller;

import org.springframework.web.bind.annotation.GetMapping;
import org.springframework.web.bind.annotation.RestController;

import io.swagger.annotations.Api;
import io.swagger.annotations.ApiOperation;

@Api(value = "初始化首页")
@RestController
public class IndexController {

	@ApiOperation(value = "index接口", nickname = "index的接口")
	@GetMapping("/index")
	public String index() {
		return "初始化index的接口";
	}
}
UserController.java
package cn.codepeople.springbootknife4j.controller;
import org.springframework.web.bind.annotation.PostMapping;
import org.springframework.web.bind.annotation.RequestBody;
import org.springframework.web.bind.annotation.RequestParam;
import org.springframework.web.bind.annotation.ResponseBody;
import org.springframework.web.bind.annotation.RestController;
import cn.codepeople.springbootknife4j.domain.UserEntity;
import io.swagger.annotations.Api;
import io.swagger.annotations.ApiImplicitParam;
import io.swagger.annotations.ApiImplicitParams;
import io.swagger.annotations.ApiOperation;
@Api(value = "用户接口")
@RestController
public class UserController {
@ApiOperation(value = "获取用户信息接口", nickname = "根据用户ID获取用户相关信息")
@ApiImplicitParam(name = "id", value = "用户ID", required = true, dataType = "int")
@PostMapping("/postMember")
public UserEntity postMember(@RequestParam Integer id) {
UserEntity userEntity = new UserEntity();
userEntity.setId(id);
userEntity.setName("admin");
return userEntity;
}
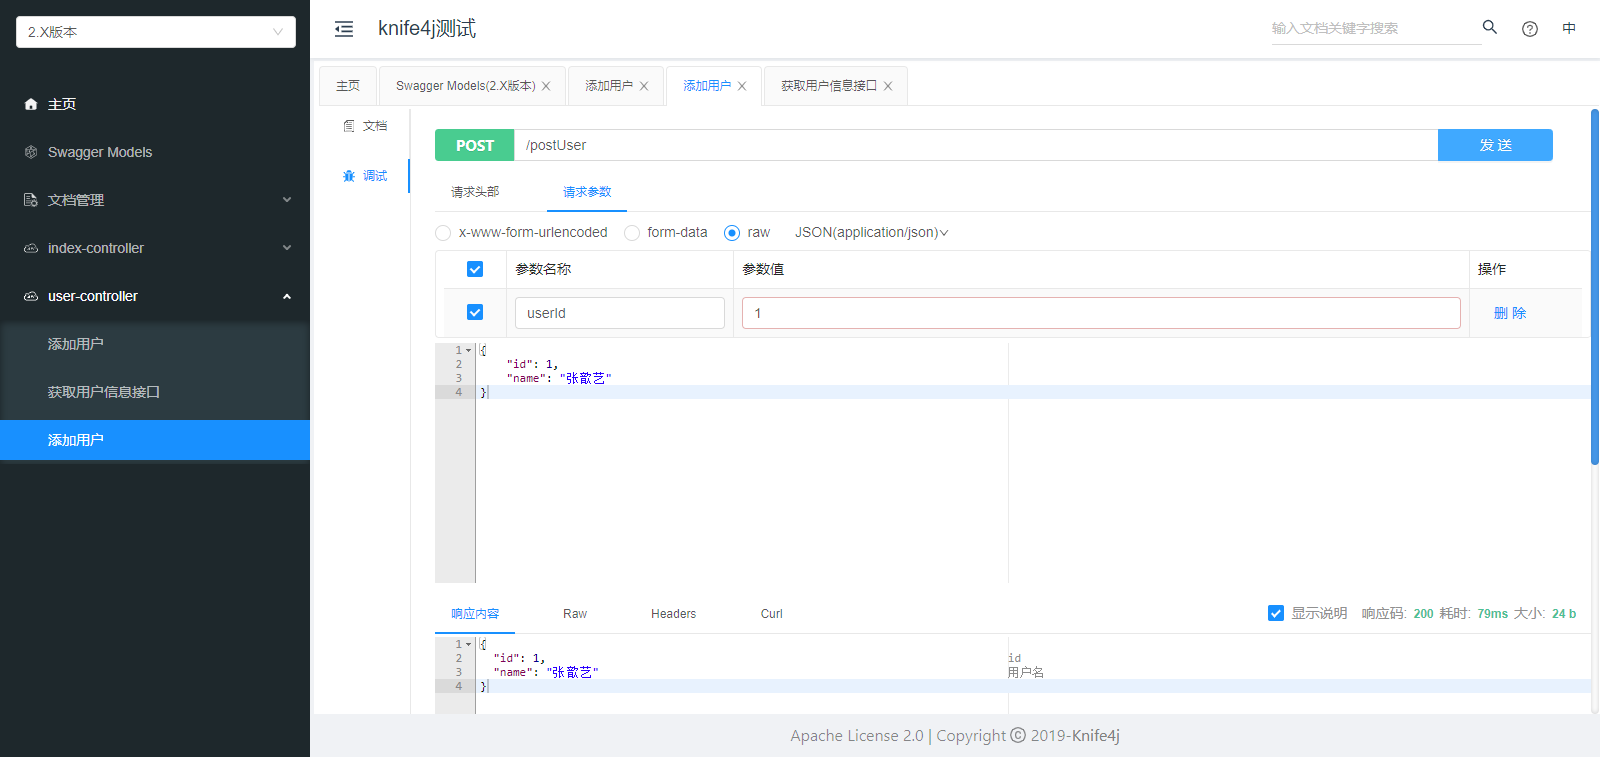
@ApiOperation(value = "添加用户", nickname = "添加用户接口1", notes = "入参是复杂对象", produces = "application/json")
@PostMapping("/postUser")
@ResponseBody
@ApiImplicitParam(paramType = "query", name = "userId", value = "用户id", required = true, dataType = "int")
public UserEntity postUser(@RequestBody UserEntity user, @RequestParam("userId") int userId) { // 这里用包装类竟然报错
if (user.getId() == userId) {
return user;
}
return new UserEntity();
}
@ApiOperation(value = "添加用户", nickname = "添加用户接口2", notes = "入参是简单对象", produces = "application/json")
@PostMapping("/addUser")
@ResponseBody
@ApiImplicitParams({
@ApiImplicitParam(paramType = "query", name = "userName", value = "用户姓名", required = true, dataType = "String"),
@ApiImplicitParam(paramType = "query", name = "id", value = "用户id", required = true, dataType = "int")})
public UserEntity addUser(String userName, int id) {
UserEntity userEntity = new UserEntity();
userEntity.setName(userName);
userEntity.setId(id);
return userEntity;
}
}
修改SpringbootKnife4jApplication.java启动类
package cn.codepeople.springbootknife4j;

import org.springframework.boot.SpringApplication;
import org.springframework.boot.autoconfigure.SpringBootApplication;
import org.springframework.boot.autoconfigure.condition.ConditionalOnClass;
import org.springframework.web.servlet.config.annotation.ResourceHandlerRegistry;

import springfox.documentation.spring.web.SpringfoxWebMvcConfiguration;

@ConditionalOnClass(SpringfoxWebMvcConfiguration.class)
@SpringBootApplication
public class SpringbootKnife4jApplication {

	public static void main(String[] args) {
		SpringApplication.run(SpringbootKnife4jApplication.class, args);
	}

	public void addResourceHandlers(ResourceHandlerRegistry registry) {
        registry.addResourceHandler("doc.html").addResourceLocations("classpath:/META-INF/resources/");
        registry.addResourceHandler("/webjars/**").addResourceLocations("classpath:/META-INF/resources/webjars/");
    }
}
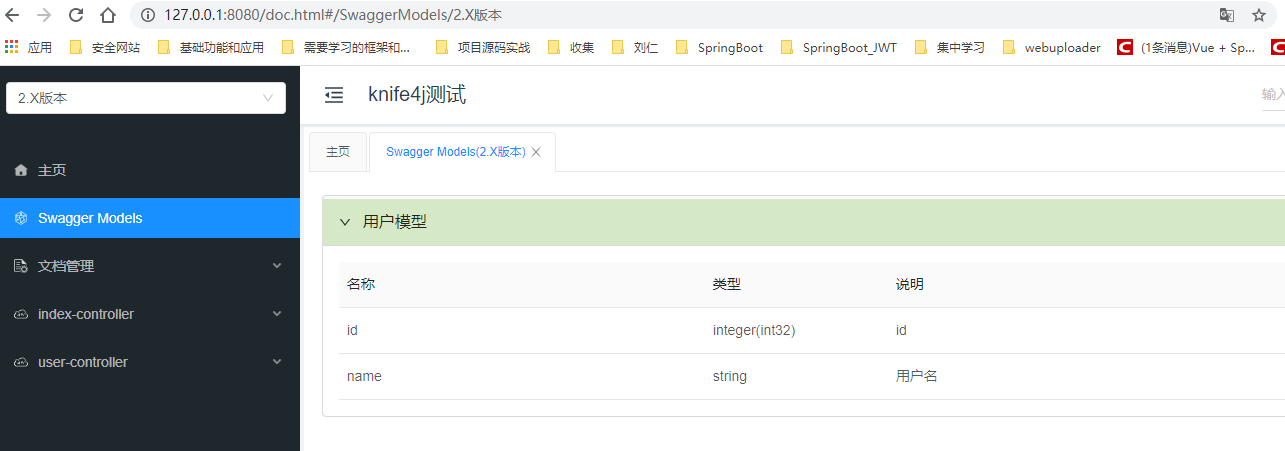
启动成功页面
访问地址是:http://127.0.0.1:8080/doc.html

博客地址:https://www.codepeople.cn
=====================================================================
微信公众号:
![]()